
Embroidery Digitizing plays an important role in turning artwork, logos, and lettering into stitch patterns that embroidery machines can understand. However, a design that looks perfect on a computer screen may appear slightly different after it is stitched onto fabric. This can be surprising, especially when the original artwork has sharp details, smooth curves, or precise colors.
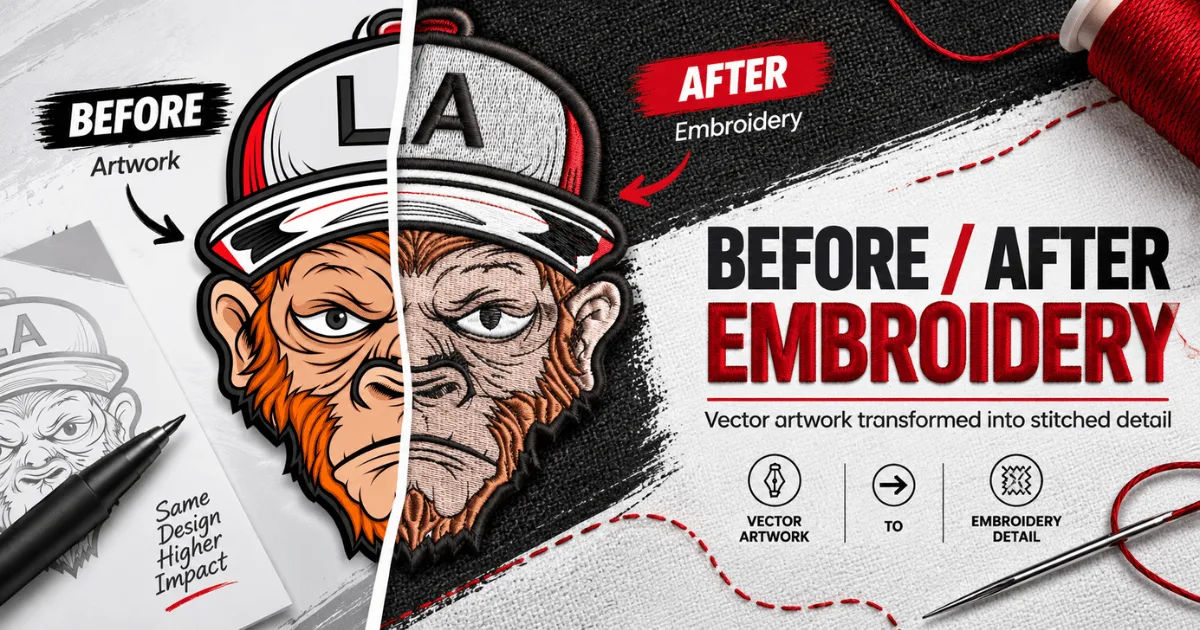
The difference does not necessarily mean the digitized design was created incorrectly. Fabric is a flexible and textured surface, while a digital screen is flat and perfectly controlled. Stitches also interact with the fabric, thread, stabilizer, needle, and embroidery machine. All these factors can change the final appearance.
Understanding why these changes happen can help businesses, designers, clothing manufacturers, and embroidery professionals achieve more consistent results. This comprehensive guide explains the main reasons an embroidered design can look different from its digital version and what can be done to improve the final result.
The Difference Between Digital Artwork and Embroidery
Digital artwork is made from pixels, lines, shapes, colors, and other visual elements. It can be displayed with extremely fine detail on a computer or phone screen.
Embroidery works differently.
A machine does not reproduce an image exactly as it appears on a screen. Instead, it creates the image using thousands of individual stitches. The digitizer must decide how those stitches should be placed, which direction they should follow, how dense they should be, and which parts should be stitched first.
This is one of the most important principles of Embroidery Digitizing.
A design may contain a very thin line that is easy to see digitally but too narrow to reproduce effectively with thread. Similarly, small spaces between letters or shapes may disappear when the design is embroidered.
Embroidery Is a Physical Process
Unlike digital graphics, embroidery has physical limitations.
Thread has thickness. Needles have specific sizes. Fabric can stretch, move, compress, or become distorted. The embroidery machine also has limits regarding stitch length, density, and movement.
As a result, the digitized design must be adapted to the physical properties of embroidery.
The goal is not always to make the stitched design look exactly like the original artwork. Instead, the goal is to create an embroidered version that communicates the same visual idea while working properly on fabric.
Fabric Type Can Change the Appearance
One of the biggest reasons embroidery looks different on fabric is the fabric itself.
Different materials react differently to embroidery. Cotton, denim, polyester, fleece, leather, canvas, knitwear, and performance fabrics all have different levels of stretch, thickness, softness, and stability.
A design stitched on firm denim may look sharp and well-defined. The same design stitched on a soft T-shirt may spread slightly or appear less detailed.
Stretchy Fabric
Stretch fabrics can create particular challenges.
Materials such as jersey, athletic fabric, and some blends can move during stitching. When the needle enters and exits the fabric repeatedly, the material may stretch and then return to its original shape.
This can affect the positioning of stitches.
Proper Embroidery Digitizing for stretchy fabrics often requires additional planning, including appropriate stabilizers, adjusted densities, and careful stitch sequencing.
Thick or Textured Fabric
Fleece and other thick fabrics can partially cover stitches.
For example, small lettering may become difficult to read because fibers rise between the stitches. A design that looks clean on a flat digital preview may therefore look softer when placed on a textured garment.
The digitizer may need to increase stitch coverage or modify the design to compensate for the fabric's texture.
Stitch Density Affects the Final Result
Stitch density refers to how closely stitches are placed within a particular area.
If an area has too few stitches, the fabric may show through. The embroidered section can look weak or incomplete.
If there are too many stitches, the design can become stiff, bulky, or distorted. Excessive density can also cause thread breaks and put unnecessary stress on the fabric.
This is why experienced Embroidery Digitizing professionals carefully balance density according to the design and fabric.
Why High Density Is Not Always Better
It may seem logical that adding more stitches will make an image look more detailed. However, excessive stitching can produce the opposite result.
Too many stitches can cause fabric puckering. It can also create thick areas that lose the intended shape of the design.
A professional digitizer considers the size of each element and chooses a suitable stitch density rather than simply adding stitches everywhere.
Stitch Direction Can Change How Colors Appear
Embroidery thread reflects light differently depending on its direction.
This means two areas using the same thread color can appear slightly different if their stitches run in different directions.
For example, satin stitches running vertically may reflect light differently from satin stitches running horizontally. The colors are technically the same, but the visual effect can change.
This is an important consideration during Embroidery Digitizing.
Creating Texture With Stitch Direction
Stitch direction is not only a technical requirement. It can also be used creatively.
Different stitch angles can create contrast and texture. They may help define petals, leaves, clothing, lettering, shadows, or other design elements.
However, if stitch directions are not planned carefully, the finished embroidery may look different from the expected design.
Thread Color Is Not the Same as Screen Color
Computer screens use RGB light to display colors. Embroidery thread uses physical pigments and materials.
Because of this, an exact digital color cannot always be reproduced with thread.
A bright color on a monitor may look slightly darker, warmer, cooler, or less vibrant when converted into embroidery thread.
Lighting conditions can also change how thread colors appear.
Thread Finish Matters
Thread can have different finishes, including shiny, matte, and specialty surfaces.
A shiny rayon thread may produce stronger highlights than a matte polyester thread. Metallic thread can create an entirely different appearance.
Therefore, selecting thread based only on a digital color sample can sometimes lead to unexpected results.
Fabric Color Influences Thread Appearance
The color of the fabric underneath the embroidery can also affect the overall visual impression.
Light-colored thread on a dark garment may look very strong and bright. The same thread on a light garment may appear softer.
In areas where the fabric remains slightly visible between stitches, the background color can influence the perceived color of the design.
For this reason, Embroidery Digitizing should consider both thread colors and the fabric on which the design will be stitched.
Underlay Stitches Affect Shape and Stability
Underlay stitches are placed beneath the visible stitches.
They help stabilize the fabric, provide a foundation for top stitches, and improve coverage. They can also influence the shape and texture of the finished design.
Different types of underlay are suitable for different situations.
A design on stable fabric may require less support, while stretchy or unstable material may need stronger stabilization.
Incorrect Underlay Can Cause Problems
Too little underlay may allow the top stitches to sink into the fabric or lose their shape.
Too much underlay can make the design unnecessarily thick and may contribute to stiffness or puckering.
Good Embroidery Digitizing takes the fabric and design structure into account when determining the appropriate underlay.
Pull Compensation Can Change Shapes
During embroidery, stitches can pull the fabric toward themselves.
This phenomenon is called pull.
When stitches are placed closely together, they can cause certain parts of a design to become narrower or shift slightly. Digitizers use pull compensation to account for this natural movement.
Without suitable compensation, circles may look slightly oval, letters may become narrower, and small shapes may lose their intended proportions.
Why Small Designs Are More Difficult
Small embroidery designs leave less room for correction.
A tiny logo may contain lettering and shapes that are only a few millimeters wide. At this scale, even a small amount of fabric movement can affect the appearance.
Professional digitizers often simplify small designs rather than trying to reproduce every tiny detail.
Stitch Length Also Matters
The length of individual stitches influences both appearance and durability.
Very short stitches can create dense areas and may make the embroidery stiff. Very long stitches can create loose sections that do not provide enough coverage.
Satin stitches are particularly sensitive to stitch length.
When satin columns become too wide, the stitches may become excessively long and lose stability. A skilled digitizer may split the area or adjust its structure to produce a cleaner result.
This is another reason Embroidery Digitizing requires more than simply converting an image into stitches.
Stitch Sequence Can Affect the Final Design
Embroidery machines follow a specific stitching sequence.
The order in which sections are embroidered affects how the design builds up. If the sequence is poorly planned, later stitches can push, cover, or distort earlier sections.
A good sequence reduces unnecessary movement and helps maintain alignment.
It can also reduce the possibility of gaps between design elements.
Overlapping Areas Need Careful Planning
Some embroidery designs contain multiple overlapping elements.
For example, an outline may need to sit over a filled shape. If these elements are stitched in the wrong order, the outline may become partially hidden or misaligned.
Proper sequencing ensures that the final layers produce the intended appearance.
Stabilizer Selection Is Important
Stabilizer provides additional support underneath or around the fabric.
Different fabrics and embroidery designs require different stabilizing approaches. A lightweight fabric may need more support than a heavy woven material.
If the stabilizer is insufficient, the fabric can move during stitching. This can result in distortion, puckering, or misalignment.
On the other hand, excessive stabilization may affect the garment's comfort and flexibility.
The right choice depends on the fabric, design size, stitch count, and intended use.
Machine Settings Can Affect Results
Even a well-digitized file can produce different results if machine settings are not appropriate.
Needle size, thread tension, embroidery speed, hooping, thread quality, and machine condition can all influence the finished product.
Thread Tension
Incorrect thread tension can create visible problems.
If the upper thread is too tight, the design may pull or show excessive bobbin thread. If it is too loose, the stitches may not sit correctly.
Proper tension helps the stitches form evenly and maintain their intended appearance.
Embroidery Speed
Higher machine speeds can sometimes increase the likelihood of thread breaks, vibration, or instability, particularly with complicated designs or difficult fabrics.
Adjusting speed appropriately can improve stitch quality.
Hooping Can Change the Design
Hooping holds the fabric securely during embroidery.
If the fabric is not hooped correctly, it may shift during stitching. If it is stretched too tightly, it can also behave differently after being removed from the hoop.
This is especially important with stretch fabrics.
Proper hooping provides a stable embroidery surface without unnecessarily distorting the material.
Artwork May Need Simplification
Not every digital design is suitable for direct conversion into embroidery.
Complex artwork may contain gradients, shadows, extremely thin lines, tiny details, and photographic elements. These features often need to be simplified.
A digitizer may replace gradients with layered thread colors or convert fine outlines into stronger stitch structures.
This process is a major part of professional Embroidery Digitizing.
Simplification Does Not Mean Losing Quality
Simplifying a design can actually improve the final result.
The purpose is to preserve the most important visual elements while removing details that embroidery cannot reproduce effectively.
For example, a small logo may look better with a simplified letter shape than with an exact but unreadable version of the original artwork.
Why a Test Stitch-Out Is Valuable
A digital embroidery preview is useful, but it cannot reproduce every physical effect.
A test stitch-out provides a real example of how the design interacts with the selected fabric and thread.
It can reveal problems such as:
- Puckering
- Poor registration
- Weak coverage
- Small unreadable lettering
- Incorrect stitch density
- Thread breaks
- Uneven outlines
- Unwanted gaps
- Fabric distortion
After reviewing the sample, the digitized file can be adjusted before large-scale production.
How to Get More Consistent Embroidery Results
Several practical steps can improve consistency.
First, provide the digitizer with the original artwork in the best available quality. Clear artwork makes it easier to understand shapes, lettering, and design proportions.
Second, specify the fabric type and garment style. A file created for denim may not perform the same way on a lightweight T-shirt.
Third, communicate the final embroidery size. A design intended for a jacket back can be built differently from a small left-chest logo.
Fourth, identify important colors and provide thread references when exact color matching matters.
Finally, request a test stitch-out for important or complicated projects.
Good communication between the designer, digitizer, and embroiderer can prevent many problems before production begins.
Common Mistakes to Avoid
One common mistake is assuming that a digital preview represents the exact physical result.
Another is using the same embroidery file for every fabric without making adjustments.
Ignoring fabric stretch is another frequent problem. A design that works perfectly on a stable woven material may require significant changes for knitwear.
Using excessive stitch density is also risky. More stitches do not automatically produce better embroidery.
Finally, skipping the test stitch-out can lead to expensive production mistakes.
Conclusion
Embroidery can look different on fabric because it is a physical interpretation of digital artwork rather than a simple copy of it. Fabric movement, thread thickness, stitch density, stitch direction, underlay, pull compensation, stabilizer, machine settings, and color differences all influence the final appearance.
Professional Embroidery Digitizing accounts for these variables before the machine begins stitching. The best results come from designing specifically for the intended fabric, embroidery size, thread, and application.
It is also important to remember that minor differences between a digital preview and finished embroidery are normal. The goal is not to make the physical thread behave exactly like pixels on a screen. The goal is to create clean, durable, attractive embroidery that communicates the original design effectively.
When the artwork is prepared properly, the fabric is stabilized correctly, machine settings are suitable, and the stitch file is professionally prepared, the difference between the digital concept and finished product can be greatly reduced.
Ultimately, successful Embroidery Digitizing combines technical knowledge with design judgment. Understanding how thread and fabric interact allows a digitizer to make smart adjustments instead of relying on automatic conversion. That careful preparation is what turns a simple digital image into professional-looking embroidery.